Thursday, December 27, 2012

Count/sum rows grouped by in XSLT Dataview WebPart

Scenario: Converted a list view to XSLT View using SharePoint Designer and grouped the list by 2 columns "Created By"(built in people and column group) and "WeekEnding" (date field).

Requirement: To display the count of each item that is grouped by "Week Ending" and "Created By" column. Also sum of "% of Week" column with the same condition.

Grouping in XSLT Dataview WebPart


    Solution:


1. Declare param <xsl:param name="usernamegroup"/> after the following lines <xsl:template name="dvt_1.groupheader0"> and <xsl:template name="dvt_1.groupheader1">


2. Search for the following line and add xsl:with-param after it
<xsl:call-template name="dvt_1.groupheader1"> 

<xsl:with-param name="usernamegroup" select="substring-after(substring-before(substring-after(@Author, 'ID='), '&lt;'), '&gt;')"/>
I've added it in 2 locations.

3. Added the following line of code to display the count in header row(refer screenshot)
<xsl:value-of select="count(/dsQueryResponse/Rows/Row[(@WeekEnding=$fieldvalue) and (substring-after(substring-before(substring-after(@Author, 'ID='), '&lt;'), '&gt;')=$usernamegroup)]/@Week_Ending)">

4. Added the following line of code to display the sum in the header row(refer screenshot)
<xsl:value-of select="format-number(string(sum(/dsQueryResponse/Rows/Row[(@WeekEnding=$fieldvalue) and (substring-after(substring-before(substring-after(@Author, 'ID='), '&lt;'), '&gt;')=$usernamegroup)]/@PercentageOfWeek)),'#,##0%;-#')" />

Wednesday, November 7, 2012

Remove User ID of a People and Group column when exporting SharePoint list to Excel


This is a VBA code to remove the user IDs from the exported spreadsheet. Apply the following code and run the macro to remove all User IDs from the spreadsheet

Sub RemoveUserIDs()
           'run against rows 1 to 10, if you want more change the start and end below
           start_of_range = 2
           end_of_range = ActiveSheet.UsedRange.Rows.Count

           'currently changes cells in colum A if you want B change to 2, C to 3 etc etc
            colum_start = 1

For col = start_of_range To ActiveSheet.UsedRange.Columns.Count
    For t = start_of_range To end_of_range
    newstring = ""
          For i = 1 To Len(Cells(t, col))
               If Not IsNumeric(Mid(Cells(t, col), i, 1)) And Mid(Cells(t, col), i, 1) <> "#" Then
                    newstring = newstring & _
                    Mid(Cells(t, col), i, 1)
               End If
         Next i
     newstring = Replace(newstring, ";;", ", ")
     newstring = Replace(newstring, ";", "")
     Cells(t, col).Value = newstring
    Next t
Next col
    ActiveWorkbook.Save
End Sub

Tuesday, November 6, 2012

Access denied. You do not have permission to perform this action or access this resource.

Error:
Access denied. You do not have permission to perform this action or access this resource.

(and)

<!-- #RENDER FAILED -->

Scenario

We have created a Custom List and added the list as a Web Part in the site's home page, grouped by 'Status' column. When the user approves an item under a Status 'Pending Cost Approval', the designer workflow will update the Status column to 'Cost Approved'. The order of action is

1. Select Approve/Reject menu for an item from the Web Part 
2. Select Approve, and click OK 
3. After approval, the page is redirected to the home page.
The issue is, when there is only one item in grouped under 'Pending Cost Approval' and since the item is getting moved to 'Cost Approval' status after approval, we are getting "Access denied. You do not have permission to perform this action or access this resource." error. No issues when there are more items in 'Pending Cost Approval' status. Attached the screen shot. Is there any workaround for this?
Access Denied error

On different version of browser, we received 'Render failed' error.
Render failed error

Resolution
I'm able to resolve this issue with the following workaround.
Set the Groupings to Expanded in the view and add the following script in a content editor web part in the same page.
<script src="/Documents/jquery-1.8.2.min.js" type= "text/javascript">
</script>
<script type="text/javascript">
function collapseGroups() {
$("img[src='/_layouts/images/minus.gif']:visible").parent().click();
}

_spBodyOnLoadFunctionNames.push("collapseGroups");
</script>


Reference: http://www.go4sharepoint.com/Forum/render-failed-error-list-view-2203.aspx

A duplicate name "" was found

Issue: Received an error when creating a site from  a custom site template.

Error: A duplicate name "Responsible" was found.

Resolution:

The issue was with the column names in a list of the site we created a custom template from. I initially created a Text field column with the name 'Responsible', later we created another Responsible column with People and group type after renaming the existing column to 'Contributors'. This actually led to an error when we created a new site using this site template. The issue was identified by renaming the site template from sitename.stp to sitename.cab > extact the cab file > open the manifest file.

Noticed that the internal name of 'Contributor' column was 'Responsible' and the display name of 'Responsible' column was 'Responsible'.

Deleting the 'Contributor' column and recreated with different internal name resolved the issue.

Monday, October 15, 2012

Read Multiple lines of Text field value using JQuery


To read a value of multiple lines of text from a Edit Form or New Form. Assume Comments is the field name

<script  language="javascript" type="text/javascript" >
function PreSaveAction()
{
   var Comments = getTagFromIdentifierAndTitle("textarea","TextField","Comments");  

   var CommentsText = RTE_GetEditorDocument(Comments.id);
   var CommentsTextValue = CommentsText .body.innerText;
}

function getTagFromIdentifierAndTitle(tagName, identifier, title) 
{  
    var len = identifier.length;  
    var tags = document.getElementsByTagName(tagName);  
    for (var i=0; i < tags.length; i++)
    {  
        var tempString = tags[i].id;  
        if (tags[i].title == title && (identifier == "" || tempString.indexOf(identifier) == tempString.length - len))
        {  
            return tags[i];  
        }  
    }  
    return null;  

</script>

Additionally, use the following code to read the selected value of a drop down.

var val =  $("select[title='ChoiceFieldName']").val();

Saturday, October 13, 2012

JavaScript date validation in SharePoint form using Designer

Requirement: To validate date fields in Edit form before submitting the form.

Conditions:

  1. Start Date should not be less than End Date
  2. Start Date and End Date should not be less than Today
<asp:Content ContentPlaceHolderId="PlaceHolderMain" runat="server">
Add the following code after above line

<script  language="javascript" type="text/javascript" >
function PreSaveAction()
{
var date1 = $("input[title='Planned Release Start Time']").val(); var date2 = $("input[title='Planned Release End Time']").val(); var today = new Date(); today.setHours(0,0,0,0); if( date1 != "" || date2 != "") { var arrDate1 = date1.split("/"); var useDate1 = new Date(arrDate1[2], arrDate1[0]-1,arrDate1[1] ); var arrDate2 = date2.split("/"); var useDate2 = new Date(arrDate2[2], arrDate2[0]-1,arrDate2[1]); if(useDate1 < today || useDate2 < today) { alert("Planned Release Start Date and End Date should not be earlier than Today"); return false; // Cancel the item save process } if(useDate1 > useDate2) { alert("The Planned Release End Date cannot be earlier than the Planned Release Start Date"); return false; // Cancel the item save process } }
 return true;

}
</script>


Thursday, September 27, 2012

Cannot remove border of a table in Content Editor Web Part

When we add a <table> tag in content editor web part, we cannot customize or remove the cell border even when we set the css styles.

Workaround for this is by overriding the .ms-WPBody TD style in the aspx page where the web part is added.


<asp:Content ContentPlaceHolderId="PlaceHolderTitleAreaClass" runat="server">
<style type="text/css">
.ms-WPBody TD
{
         border:0;
}
</style>
</asp:Content>

Sorting Outline number in MOSS programmatically


To create a calculated field to sort the outline numbers programmatically. Following code helps to create the fields and calculated values on feature activation.

Feature Receiver Code


  string strListName = "Checklist";
        string fieldName = "Outline";
        string strSortFieldname = "CustomOutlineSort";
        string strCalculatedFieldname = "OutlineSorted";
        string OutlineFieldValue = string.Empty;
        string newOutlineFieldValue;

        /// <summary>
        /// FeatureActivated
        /// </summary>
        /// <param name="properties"></param>
        public override void FeatureActivated(SPFeatureReceiverProperties properties)
        {
            try
            {
                SPSecurity.RunWithElevatedPrivileges(delegate()
               {
                   using (SPWeb web = (SPWeb)properties.Feature.Parent)
                   {
                       web.AllowUnsafeUpdates = true;
                       SPList objSPList = web.Lists[strListName];
                       //Create Readonly field 'CustomOutlineSort'
                       objSPList.Fields.Add(strSortFieldname, SPFieldType.Text, false);
                       SPFieldText txtField = (SPFieldText)objSPList.Fields[strSortFieldname];
                       txtField.ReadOnlyField = true;
                       txtField.Update();

                       //Create calculated field 'OutlineSorted'
                       objSPList.Fields.Add(strCalculatedFieldname, SPFieldType.Calculated, false);
                       SPFieldCalculated CalcField = (SPFieldCalculated)objSPList.Fields[strCalculatedFieldname];
                       CalcField.Formula = @"=" + strSortFieldname;
                       CalcField.Update();

                       objSPList.Update();
                       web.AllowUnsafeUpdates = false;

                       CalculateSortValue(properties);
                   }

               });
            }
            catch (Exception ex)
            {
                throw new SPException("An error occured when activating the feature. Make sure that the list 'Checklist' exists in this site.");
            }
        }


private void CalculateSortValue(SPFeatureReceiverProperties properties)
        {
            try
            {
                using (SPWeb oSite = (SPWeb)properties.Feature.Parent)
                {
                    oSite.AllowUnsafeUpdates = true;
                    SPList oList = oSite.Lists[strListName];

                    //Check if Outline, CustomOutlineSort and OutlineSorted fields are created.
                    if (oList.Fields.ContainsField(fieldName) && oList.Fields.ContainsField(strSortFieldname) && oList.Fields.ContainsField(strCalculatedFieldname))
                    {
                        foreach (SPListItem oListItem in oList.Items)
                        {
                            //Check if Outline field value is not empty
                            if (oListItem[fieldName] != null)
                            {
                                newOutlineFieldValue = string.Empty;
                                OutlineFieldValue = oListItem[fieldName].ToString();
                                string[] sections = OutlineFieldValue.Split('.');

                                //loop all the parts splitted with dot and left pad with '0' and make total width as 2 characters.
                                foreach (string section in sections)
                                {
                                    newOutlineFieldValue = newOutlineFieldValue + section.PadLeft(2, '0');
                                }
                                //append '00'to make total of 8 characters
                                for (int i = sections.Length; i < 4; i++)
                                {
                                    newOutlineFieldValue = newOutlineFieldValue + "00";
                                }
                            }
                            //Store the customized value in readonly field 'CustomOutlineSort'.
                            oListItem[strSortFieldname] = newOutlineFieldValue;
                            oListItem.Update();
                        }
                    }
                }
            }
            catch (Exception ex)
            {
                throw new SPException("An error occured while calculating sort values for 'Outline' column in 'Checklist' list");
            }
        }


EventHandler code for ItemAdded and ItemUpdated events

//Sorting Outline Numbers in SharePoint list

string listName = "Checklist";
        string fieldName = "Section";
        string strSortFieldname = "CustomSectionSort";
        string strCalculatedFieldname = "SectionSorted";
        string OutlineFieldValue = string.Empty;
        string newOutlineFieldValue;

  /// <summary>
        /// Method to make the outline number sortable. The logic used is, the value will be splitted by dot and left pad
        /// each part with '0' to width of 2. After padding, merge all the parts and save the value in 'CustomOutlineSort' field.
        /// For instance 1.1.1 will be saved as 010101.
        /// </summary>
        /// <param name="properties"></param>
        private void CalculateSortValue(SPItemEventProperties properties)
        {
            try
            {
                SPWeb oSite = properties.OpenWeb();
                SPList oList = oSite.Lists[listName];
                SPListItem oListItem = properties.ListItem;

                //Check if Outline, CustomOutlineSort and OutlineSorted fields are created.
                if (oList.Fields.ContainsField(fieldName) && oList.Fields.ContainsField(strSortFieldname) && oList.Fields.ContainsField(strCalculatedFieldname))
                {
                    if (properties.ListItem[fieldName] != null)
                    {
                        newOutlineFieldValue = string.Empty;
                        OutlineFieldValue = properties.ListItem[fieldName].ToString();
                        string[] sections = OutlineFieldValue.Split('.');

                        foreach (string section in sections)
                        {
                            newOutlineFieldValue = newOutlineFieldValue + section.PadLeft(2, '0');
                        }
                        for (int i = sections.Length; i < 4; i++)
                        {
                            newOutlineFieldValue = newOutlineFieldValue + "00";
                        }
                    }
                    oListItem[strSortFieldname] = newOutlineFieldValue;
                    oListItem.Update();
                    oList.Update();
                }
            }
            catch (Exception ex)
            {
             
            }
        }

Friday, September 21, 2012

Sorting Outline Numbers in SharePoint list using Calculated columns

Requirement: We have a column in a list named SNumber. The value for this is would be similar to outline numbers in Word documents.

1.1
1.2
1.3
1.10
1.1.1
1.1.2
1.2.3.3
etc

Problem: We were not able to sort the values, and the values are sorted in the following order. The SharePoint calculated field formulas are not strong enough to achieve this.

1.1
1.10
1.2
1.3
etc


Workaround: We have multiple options to achieve this, this can be done using Event Handlers. Here this is done using multiple calculated field.

The minimum and maximum value would be
1.0 to 99.99.99.99

The logic used to achieve this is to split and pad the values. For instance, converting the following value
1.10.2.3   to 01100203

01.10.02.03 (prefix '0' before each part separated by dot)
01100203 (and  merge all the parts)

For this, I've created 8 calculated columns, you just need to replace the field name SNumber with your field name.

Column Name
Formula
part1
=IF(LEN(LEFT(SNumber,INT(FIND(".",SNumber)-1)))
<2,"0"&LEFT(SNumber,INT(FIND(".",SNumber)-1)),
LEFT(SNumber,INT(FIND(".",SNumber)-1)))
section2
=RIGHT(SNumber,LEN(SNumber)-INT(FIND(".",SNumber)))
part2
=IF(ISNUMBER(INT(FIND(".",section2)-1)),
IF(LEN(LEFT(section2,INT(FIND(".",section2)-1)))<2,
"0"&LEFT(section2,INT(FIND(".",section2)-1)),
LEFT(section2,INT(FIND(".",section2)-1))),
IF(LEN(section2)<2,0&section2,section2))
section3
=RIGHT(section2,LEN(section2)-IF(ISNUMBER(INT(FIND(".",section2))),
INT(FIND(".",section2)),LEN(section2)))
part3
=IF(ISNUMBER(INT(FIND(".",section3)-1)),
IF(LEN(LEFT(section3,INT(FIND(".",section3)-1)))<2,
"0"&LEFT(section3,INT(FIND(".",section3)-1)),
LEFT(section3,INT(FIND(".",section3)-1))),IF(LEN(section3)=0,"00",
IF(LEN(section3)<2,"0"&section3,section3)))
section4
=RIGHT(section3,LEN(section3)-IF(ISNUMBER(INT(FIND(".",section3))),
INT(FIND(".",section3)),LEN(section3)))
part4
=IF(ISNUMBER(INT(FIND(".",section4)-1)),IF(LEN(LEFT(section4,
INT(FIND(".",section4)-1)))<2 amp="" div="" section4="">
LEFT(section4,INT(FIND(".",section4)-1))),IF(LEN(section4)=0,"00",IF(LEN(section4)<2,"0"&section4,section4)))
customSNumber
 =IF(ISNUMBER(part1&part2&part3&part4),part1&part2&part3&part4,0)

Now, just sort the list by customSNumber column

Monday, June 25, 2012

How to replace single quote in XSLT

To replace a single quote in an XSLT view of Dataform webpart, the following solution is the easiest.

The condition we wanted to check is if the column Resolution is equal to Won't Fix, since there was a single quote in the condition, the web part was failing to display. So the condition is changed like below to replace the single quote with white space.


 <xsl:value-of select="count(/dsQueryResponse/Rows/Row[translate(@Resolution, &quot;'&quot;,'') = 'Wont Fix'])"/>

Thursday, June 21, 2012

Apply borders to the XSLT Data View using SharePoint Designer

The Dataview webpart is customized by converting it to XSLT Data View.
To apply border for the XSLT Data View table using SharePoint Designer. 

In Designer, locate the table tag in the Web Part source view

<TABLE ID="{$List}-{$View}" Summary="{$List}" xmlns:o="urn:schemas-microsoft-com:office:office" o:WebQuerySourceHref="{$HttpPath}&amp;XMLDATA=1&amp;RowLimit=0&amp;View={$View}" width="100%" class="ms-listviewtable" border="0" 

Update the border="1" and also other changes based on your requirement, refer to the following post for more information about the table styles

http://www.htmlcodetutorial.com/tables/index_famsupp_147.html

If you applying the border for both rows and column, you'll see the border missing in the empty fields. You need to replace the empty fields with white-space.
"&nbsp;" will not work in XSLT, instead you can use &#160; 

Wednesday, June 13, 2012

SharePoint Server Error in '/' Application. The resource cannot be found.


I was getting the following error when trying to access the SharePoint site.

Server Error in '/' Application.

The resource cannot be found.

Description: HTTP 404. The resource you are looking for (or one of its dependencies) could have been removed, had its name changed, or is temporarily unavailable. Please review the following URL and make sure that it is spelled correctly.

Requested URL: /sites/companyname/default.aspx


Solution:

My SharePoint site was running in port 80. In IIS, I noticed that the Default Web Site, that is supposed to be stopped, was running. I stopped the Default Web site and the SharePoint site is up and running

Thursday, May 24, 2012

List all site owners in a site collection programmatically


The following code is a simple code to get all site owners from the site collection. Execute the following code as a console application

using System;
using System.Collections.Generic;
using System.Linq;
using System.Text;
using Microsoft.SharePoint;
using System.IO;

namespace MyPortal
{
    class ListAllSiteOwners
    {
     
        static void Main(string[] args)
        {
            SPSecurity.RunWithElevatedPrivileges(delegate()
            {

                FileStream ostrm;
                StreamWriter writer;
                TextWriter oldOut = Console.Out;
                try
                {
                    ostrm = new FileStream("./SiteOwners.txt", FileMode.OpenOrCreate, FileAccess.Write);
                    writer = new StreamWriter(ostrm);
                }
                catch (Exception e)
                {
                    Console.WriteLine("Cannot open  SiteOwners.txt for writing");
                    Console.WriteLine(e.Message);
                    return;
                }
                Console.SetOut(writer);

             
                using (SPSite site = new SPSite(args[0]))
             
                    foreach(SPWeb web in site.AllWebs)
                    {
                        //SPUserCollection allAdmins = web.AssociatedOwnerGroup;
                        SPGroup ownerGroup = web.AssociatedOwnerGroup;
                        if (ownerGroup != null)
                        {

                            foreach (SPUser user in ownerGroup.Users)
                            {
                                Console.WriteLine(web.Url +"\t"+ ownerGroup.Name + "\t" + user.Name);
                            }
                        }
                        web.Dispose();
                    }
             
                Console.SetOut(oldOut);
                writer.Close();
                ostrm.Close();
            });
        }
    }
}

After the code is built, you need to execute the  ListAllSiteOwners.exe from the command prompt with site collection URL as argument. 

D:\> ListAllSiteOwners http://yoursitecollectionURL

You will find the  SiteOwners.txt  file in the same location where the exe is placed. Copy the content from the text to excel for better view.

Thursday, March 29, 2012

Programmatically add a blank row at the end of a InfoPath repeating table

Code snippet to add a blank row as last row in a InfoPath repeating table. 

//Get the repeating table node
XPathNavigator Group = MainDataSource.CreateNavigator().SelectSingleNode("/my:myFields/my:AnalysisGroup/my:AnalysisTable", NamespaceManager);
//Get the Iterator object to iterate the node to last row
XPathNodeIterator rows = Group.Select("/my:myFields/my:AnalysisGroup/my:AnalysisTable", NamespaceManager);
                      
//Loop to move the cursor to last row
for (int counter = 0; counter < rows.Count; counter++, rows.MoveNext()) ;
//clone the last row and insert it after that
rows.Current.Clone();
rows.Current.InsertAfter(rows.Current);
//move the cursor to the last row
rows.MoveNext();
                      
//Set all the fields in the row to blank
rows.Current.SelectSingleNode("my:ItemDesc", NamespaceManager).SetValue("");
rows.Current.SelectSingleNode("my:Tax", NamespaceManager).SetValue("");

Friday, March 16, 2012

Print a Web Part Zone

Requirement: To print multiple Web Parts in a Web Part zone from the home page of a Web site.

Following are the steps to achieve this

1. Add the Web Parts in a Web Part Zone

2. Open the site in the SharePoint Designer, open the home page aspx file, select the Web Part Zone that you want to take the print out in the design view,  and wrap the Web Part zone by adding a <div> tag,


<div id="WebPartZone1">
<table width="100%"  cellpadding=0 cellspacing=0 style="padding: 5px 10px 10px 10px;">
 <tr>
  <td valign="top" width="70%" colspan="4">
  <WebPartPages:WebPartZone .................
                                    ..................................
                                      ..............................
                              </WebPartPages:WebPartZone>
                    </td>
                    </tr>
                     </table>
</div>


3. Add a Content Editor Web Part in the Zone and add the following script code in the source


<style type="text/css">
.styled-button-2 {
-webkit-box-shadow: rgba(0, 0, 0, 0.0976562) 0px 1px 0px 0px;
background-color: #EEE;
border: 1px solid #999;
color: #666;
font-family: 'Lucida Grande', Tahoma, Verdana, Arial, Sans-serif;
font-size: 11px;
font-weight: bold;
padding: 2px 6px;
height: 28px;
}
</style>
<div id='printButton' align="right"><input type="button" class="styled-button-2" OnClick="javascript:void(PrintWebPart())" value="Print Dashboard"></div>

<script language="JavaScript">
//Controls which Web Part or zone to print
var WebPartElementID = "WebPartZone1";

//Function to print Web Part
function PrintWebPart()
{
var bolWebPartFound = false;
if (document.getElementById != null)
{
//Create html to print in new window
var PrintingHTML = '<HTML>\n<HEAD>\n';
//Take data from Head Tag
if (document.getElementsByTagName != null)
   {
var prButton = document.getElementById('printButton');
        prButton.style.display = 'none';
   var HeadData= document.getElementsByTagName("HEAD");
   if (HeadData.length > 0)
    PrintingHTML += HeadData[0].innerHTML;
   }
PrintingHTML += '\n</HEAD>\n<BODY>\n';
var WebPartData = document.getElementById(WebPartElementID);
if (WebPartData != null)
{
   PrintingHTML += WebPartData.innerHTML;
   bolWebPartFound = true;
}
else
{
   bolWebPartFound = false;
   alert ('Cannot Find Web Part');
}
}
PrintingHTML += '\n</BODY>\n</HTML>';
//Open new window to print
if (bolWebPartFound)
{
var PrintingWindow = window.open("","PrintWebPart", "toolbar,width=800,height=600,scrollbars,resizable,menubar");
PrintingWindow.document.open();
PrintingWindow.document.write(PrintingHTML);
// Open Print Window
PrintingWindow.print();
}
prButton.style.display = '';
}
</script>

Thursday, February 16, 2012

Trigger event when field value changed in Infopath Repeating table programmatically

Requirement: To update a field value in a repeating table when another field value is changed.

Solution: In the Infopath form, select the field that you want to apply event, go to Tools menu, select Programming > select Changed Event


This will redirect you to the VSTO event, write the code to change the main data source.

Thursday, January 26, 2012

'NaN' in InfoPath Decimal/ percentage field

In InfoPath 2007, we used to get NaN in our calculated decimal fields. So, I tried to add a Rule to check if the value is NaN and replace it is with '0' if it is true. However, there is no option to check if the value of a decimal field with a text NaN
NaN error in calculated decimal fields

So the workaround for this is, change the field type to text and add the rule as below. After creating the rule, again change the field type to Decimal.

NaN error in calculated decimal fields

Wednesday, January 25, 2012

Sumproduct in InfoPath 2007

An workaround to do similar to excel Sumproduct function in InfoPath 2007

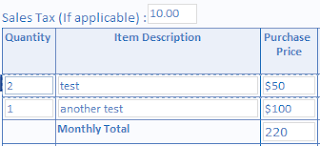
We had a requirement to calculate the sum of product of 2 column in a repeating table. See the screen shot below

Sumproduct in InfoPath 2007

Sales Tax is a Decimal field with Percentage format enabled
Quantity is an integer
Purchase Price is Decimal field
Monthly Total is Decimal field

We want the Monthly Total value to be
Monthly Total = Sum(Quality * Purchase Price) * percentage of Sales Tax

Since there is no option to do the sum(Quality * Purchase) in InfoPath as  SUM XPath function takes only a node set as parameter, I've created a field named QuantityPurchasePrice to have the product of Quality and Purchase Price and made the field hidden by setting the conditional formatting as below

Sumproduct in InfoPath 2007


Now apply the following formula in the Total field

sum(QuantityPurchasePrice) * (1 + SalesTax)


..and with some sample value, the output is

Calculate Sumproduct in InfoPath 2007


Monday, January 23, 2012

unbound (control cannot store data)

Scenario: In Design view of a InfoPath 2007 form, had several controls within a table and the table is placed within a section control. Deleted the section control and got the following error in all the controls within the section

Issue: Error in controls as "unbound (control cannot store data)"

Reason: The controls has unbind

Resolution: Right click each control, click Change Binding and from the data source, select the appropriate field in which to store the control data .

InfoPath Change Binding